All the Elements of a Complete Workflow
The supplier or purchase order is the document that lets you manage price negotiations, control supplier invoices, handle goods receipts and synchronize all of these documents.
Let us start by looking at the following order workflow:
- Price request to the supplier,
- Confirmation of purchase,
- Receipt and control of products,
- Control of invoicing.
Setting up your Database
To set up a system for these examples, create a new database with demonstration data in it, and select the Extended interface when you log in as the admin user. You can enter your own company details when asked, or just use the default if you want.
Then, using the Configuration Wizard, select Purchase Management in the Install Applications section to install the purchase module, which also installs several other modules as dependencies. Continue the remainder of this chapter logged in as the admin user.
Price Request from the Supplier
To enter data for a new supplier price request (i.e. request for quotation), use the menu Purchases ‣ Purchase Management ‣ Request for Quotation. When you click New, OpenERP opens a blank request for quotation form that you use for requesting prices from a supplier. This is shown in the figure Data Entry for a Purchase Order. If the price request came from an automatic procurement created by OpenERP, you will find a reference to the document that generated the request in the Origin field.
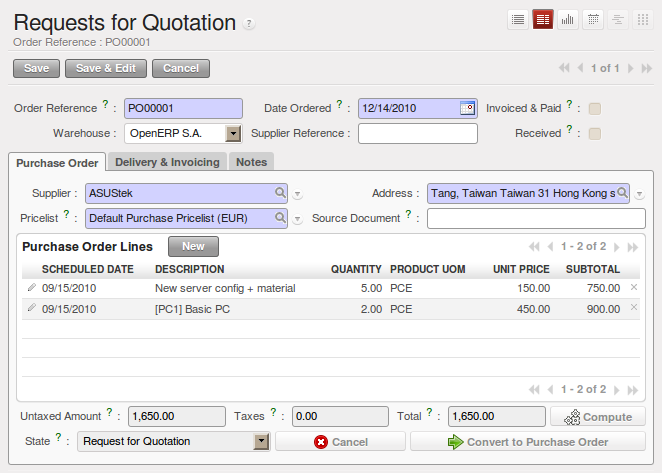
Data Entry for a Purchase Order
Note
Managing Alerts
If you install the warning module, you will be able to define alerts that appear when the purchaser enters a price request or order. You can set alerts on the product and on the supplier.
The internal reference, the date and the warehouse the products should be delivered to, are completed automatically by OpenERP, but you can change these values if needed. Next, when you select a supplier, OpenERP automatically completes the contact address for the supplier. The pricelist is also automatically completed from the pricelist in the supplier form. This should bring in all of the conditions that you have negotiated with the supplier for a given period.
Tip
Supplier Selection
Searching for a supplier is limited to all of the partners in the system that have the Supplier checkbox checked. If you do not find your supplier, it might be worth checking the whole list of all partners to make sure that the supplier does not yet exist without the Supplier checkbox being checked.
Once the main body of the purchase order has been completed, you can enter the product lines.
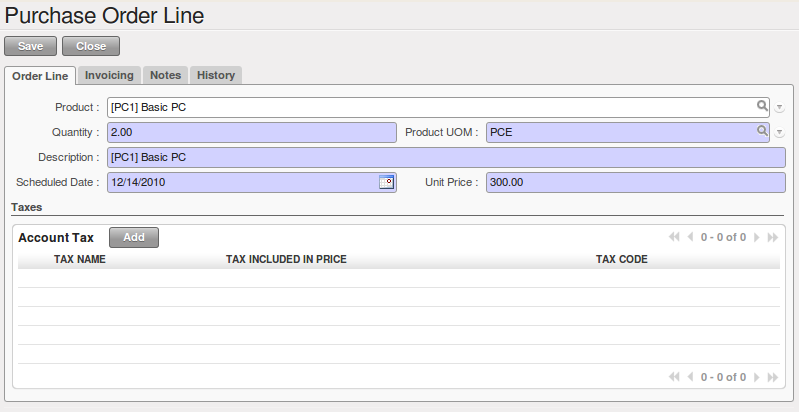
Purchase Order Line
When you have selected the product, OpenERP automatically completes the other fields in the form:
- Product UoM, taken from the Purchase Unit of Measure field in the product form,
- The Description of the product in the supplier’s language,
- Scheduled Date, calculated from the order date and the delivery lead time for the supplier (for the given product),
- Unit Price, taken from the supplier’s pricelist,
- Taxes, taken from the information on the product form and partner form, depending on the rules seen in Financial Analysis.
Tip
Product Wording and Code
When you enter supplier names in the product form, you can set a name and a product code for each individual supplier. If you do that, OpenERP will then use those details instead of your own internal product names for that selected supplier.
If you work with management by case, you can also set the analytic account that should be used to report all the purchase costs. The costs will then be reported at the receipt of the supplier invoice.
Tip
Management by Case
Analytic accounts can be very useful for all companies that manage costs by case, by site, by project or by folder. To work with several analytic axes, you should install the module purchase_analytic_plans, by selecting Purchase Analytic Plans in the Reconfigure wizard and clicking Configure.
To make sure that the analytic account is automatically selected according to the partner, the date, the products or the user, you can install the module account_analytic_default (which is installed automatically as a dependency of purchase_analytic_plans).
In the Notes tab of the product line, you can enter a note that will be attached when the order confirmation or price quotation is printed. This note can be predefined on the product form to automatically appear on each order for that product. For example, you can enter “Do not forget to send by express delivery as specified in our contract reference 1234.”
Once the document has been completed, you can print it as a price estimate to send to the supplier. You can set a note for the attention of the supplier in the form’s third tab.
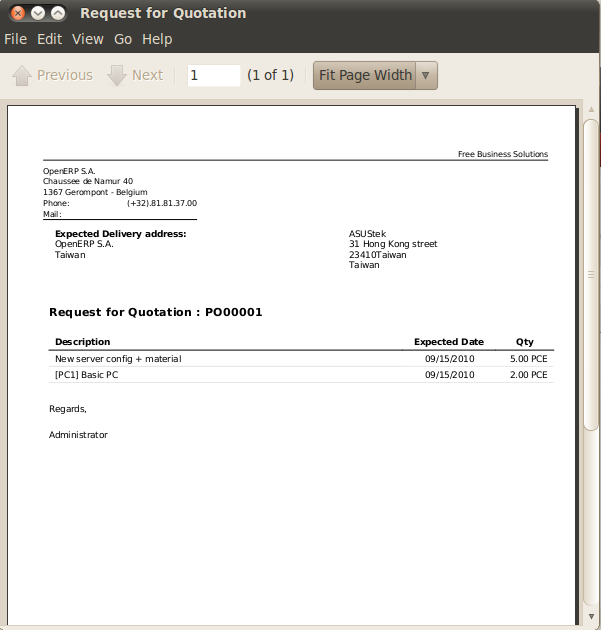
Printing the Supplier Price Quotation
Then leave the document in the Request for Quotation state. When you receive a response from the supplier, use the menu Purchases ‣ Purchase Management ‣ Requests for Quotation. Select the order and complete its details.
When you want to approve the order, use the button Convert to Purchase Order. The price request then passes into the Approved state. No further changes are possible.
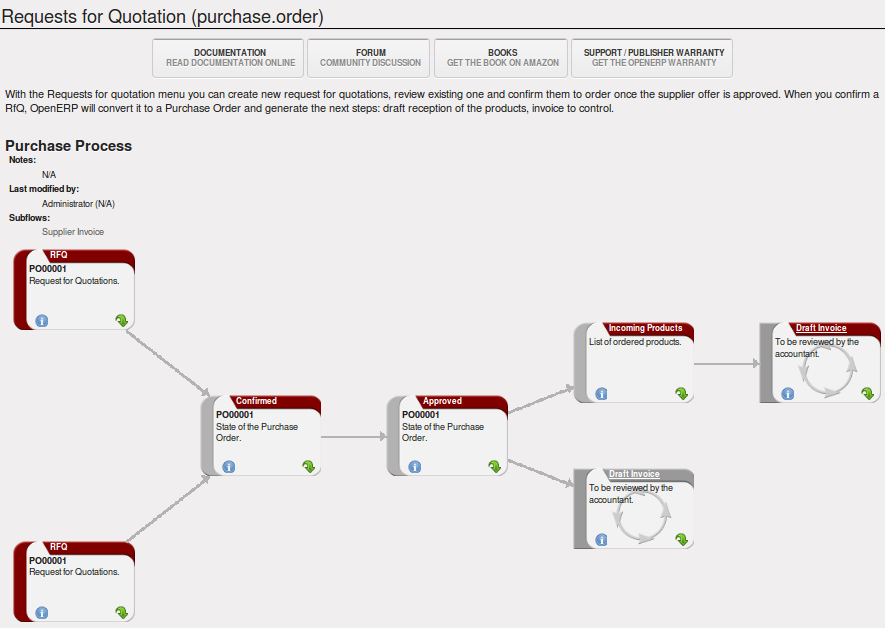
Purchase Order Process
Goods Receipt
Once the order has been approved, OpenERP automatically prepares the goods receipt order in the draft state for you. To get a list of the products you are waiting for from your suppliers, use the menu Warehouse ‣ Warehouse Management ‣ Incoming Shipments.
Tip
Purchasing Services
If you buy services from your supplier, OpenERP does not generate a goods receipt note. There is no service receipt equivalent to a goods receipt.
Select the document that corresponds to the item that you are receiving. Usually, the goods receipt note is found by making a search on the order reference or the supplier name. You can then confirm the receipt of the products.
As described in Your Warehouse, if you receive only part of the order, OpenERP manages the remainder of that order. A second receipt note is then automatically created for the goods not received. You can cancel it if you think that you will never receive the remaining products.
After receiving the goods, OpenERP will show you which orders are open and the state of their receipt and invoicing if you return to the list of orders.
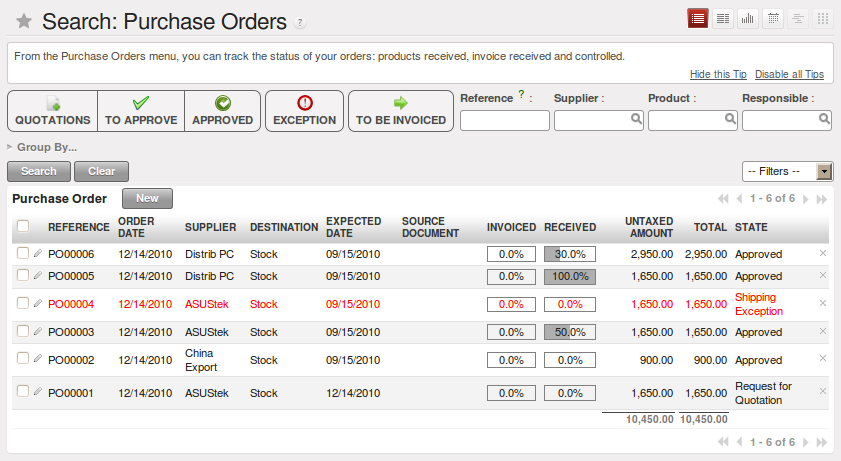
List of Open Orders, and their Receipt and Invoice Status
Control of Invoicing
To control supplier invoicing, OpenERP provides three systems as standard, which can differ order by order:
- From Order : invoicing based on quantities ordered,
- From Picking : invoicing based on quantities received,
- Manual : manual invoicing.
The mode of invoicing control is set in the second tab of the purchase order in the field Invoicing Control.
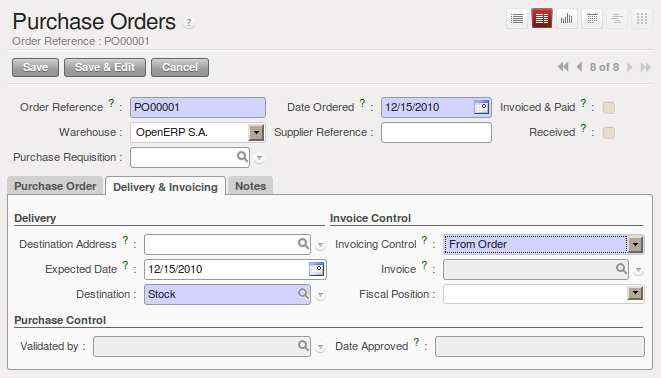
Purchase Order, Invoice Control
Tip
Default Value
A company generally uses a single invoicing control method for all of its invoices. So you are advised to set a default value in the Invoicing Control field after installation.
Control based on Orders
If you selected your invoicing control based on orders, OpenERP will automatically generate a supplier invoice in the draft state when the order is confirmed. You can obtain a list of invoices waiting using the menu Accounting ‣ Suppliers ‣ Supplier Invoices and enabling the Draft filter.
When you receive a paper invoice from your supplier, all you need to do is validate the invoice pre- generated by the system. Do not forget to check the price and the quantities. When the invoice is confirmed, the accounting entries represent the cost of purchase and are automatically entered into the system.
The supplier order is automatically set as Paid when you pay the supplier invoice.
This method of controlling invoices is often used in service companies, because the invoiced amounts correspond to the ordered amounts. In logistics, by contrast, you most often work with invoicing controlled by goods receipt.
Control based on Goods Receipt
To control your supplier invoices based on goods receipt, set the field Invoicing Control on the second tab of the order to From Picking.
In this case, no invoice, draft state or any other, is generated by the order. On the goods receipt note, the field Invoice Control is set to To Be Invoiced.
The storesperson can then receive different orders. If he wants to generate the draft invoice for a goods receipt, he can click the action Create Invoice. OpenERP then asks you for the journal for this invoice. It then opens that or the generated invoices (in the case of creating invoices for several receipts at one time) which enables you to modify it before confirming it.
This approach is useful when you receive the invoice at the same time as the item from the supplier. Usually, invoices are sent by post some days later. In this case, the storesperson leaves the item unchanged without generating an invoice. Then, once per day or once per week the accountant will create the draft invoices based on all the receipts for the day. To do that, he uses the menu Purchases ‣ Invoice Control ‣ Purchase Lines Not Invoiced. He clicks the action Create invoices to generate all draft invoices from the list of receipts that have not yet been invoiced.
At that point, the accountant can decide if he wants to generate an invoice per item or group all items for the same partner into the same invoice.
Invoices are then handled just like those controlled from On Order. Once the invoice arrives at the accounting service, he just compares it with the invoices waiting to control what the supplier invoices you.
Tip
Delivery Charges
To manage delivery charges, install the module delivery using the Reconfigure wizard and selecting Delivery Costs in Sales Application Configuration section. This will automatically add delivery charges to the creation of the draft invoice as a function of the products delivered or ordered.
Tenders
To manage tenders, you should use the module purchase_requisition, installed via the Purchase Requisition option in the Reconfigure wizard. This lets you create several supplier price requests for a single supply requirement. Once the module is installed, OpenERP adds a new Purchase Requisitions menu in Purchases ‣ Purchase Management. You can then define the new tenders.

Defining a Tender
To enter data for a new tender, use the menu Purchases ‣ Purchase Management ‣ Purchase Requisitions and select New. OpenERP then opens a new blank tender form. The reference number is set by default and you can enter information about your tender in the other fields.
If you want to enter a supplier’s response to your tender request, add a new draft purchase order into the list on the Quotation tab of your tender document. If you want to revise a supplier price in response to negotiations, edit any appropriate purchase order that you have left in the draft state and link that to the tender.
When one of the orders about a tender is confirmed, all of the other orders are automatically cancelled by OpenERP if you selected the Purchase Requisition (exclusive) type. That enables you to accept just one order for a particular tender. If you select Multiple requisitions, you can approve several purchase orders without cancelling other orders from this tender.
Price Revisions
OpenERP supports several methods of calculating and automatically updating product costs:
- Standard Price: manually fixed, and
- Standard Price: revalued automatically and periodically,
- Average Price: updated at each receipt to the warehouse.
This cost is used to value your stock and represents your product costs. Included in that cost is everything directly related to the received cost. You could include such elements as:
- supplier price,
- delivery charges,
- manufacturing costs,
- storage charges.
Standard Price
The mode of price management for the product is shown in the tab Information on the product form. On each individual product, you can select if you want to work in Standard Price or on weighted Average Price.
Tip
Simplified Interface
If you work in the Simplified interface mode you will not see the field that lets you manage the price calculation mode for a product. In that case, the default value is Standard Price.
The Standard Price setting means that the product cost is fixed manually for each product in the field Cost Price. This is usually revalued once a year based on the average of purchase costs or manufacturing costs.
You usually use standard costs to manage products where the price hardly changes over the course of the year. For example, the standard cost could be used to manage books, or the cost of bread.
Those costs that can be fixed for the whole year bring certain advantages:
- you can base the sale price on the product cost and then work with margins rather than a fixed price per product,
- accounting is simplified because there is a direct relationship between the value of stock and the number of items received.
To get an automated periodic revaluation of the standard price you can use the action Update on the product form, enabling you to update prices of all the selected products. OpenERP then recalculates the price of the products as a function of the cost of raw materials and the manufacturing operations given in the routing.
Average Price
Working with standard prices does not lend itself well to the management of the cost price of products when the prices change a lot with the state of the market. This is the case for many commodities and energy.
In this case, you would want OpenERP to automatically set the price in response to each goods receipt movement into the warehouse. The deliveries (exit from stock) have no impact on the product price.
Tip
Calculating the Price
At each goods receipt, the product price is recalculated using the following accounting formula: NP = (OP * QS + PP * QR) / (QS + QR), where the following notation is used:
- NP: New Price,
- OP: Old Price,
- QS: Quantity actually in Stock,
- PP: Price Paid for the quantity received,
- QR: Quantity Received.
If the products are managed as a weighted average, OpenERP will open a window that lets you specify the price of the product received at each goods receipt. The purchase price is, by default, set from the purchase order, but you can change the price to add the cost of delivery to the various received products, for example.

Goods Receipt of Products managed in Weighted Average
Once the receipt has been confirmed, the price is automatically recalculated and entered on the product form.